Monday, November 11, 2013

Nest and Nibble Vintage Rentals!


I am so excited to present....Nest and Nibble Vintage Rentals!!

This has been something that I always wanted to do. My dream job is what I am doing now- a mom and wife. But Alternate Life LeeAnn would have been an events planner. I just know it.

This is probably 10% business and 90% hobby. So nothing crazy or too extravagant. I just want to be able to help people make their parties, pictures, and small weddings lovely. I also have a passion for people to have the beauty at their event with out the ugly price tag. This is why I plan on remaining somewhat small and running strictly from my basement. Therefore, here is my mission statement:

To provide beautiful, high quality, vintage items to rent for the people in my community to get the satisfaction of a beautiful event and a positive experience- without the hefty price tag.

I love the treasures that I have collected. I love thinking about the people that owned and used these items so long ago- to have a little piece of everyday history...I think that's why I love vintage/antique. So much of it is from my own family, and some is what I have found over the last few years. I would love to share it with others and I feel like this would be such a fun way to do so. And make a little cash on the side...why not??

If you are interested, live in Utah County, Utah, and would like to get a really good deal for some of my first events, contact me at leelee_marie@hotmail.com
Every time I do an event, I will do a post on it so people can get new ideas, and see what items I have available for rent. I have some good friends (Ryan Carter Photography) that will be taking some pictures for me so that everything looks "all professional like." But until then, here are some of my items:


The chair, not the child ;)


How to do a gallery wall

I love the look of gallery walls. It's a great way to display your favorite pictures, art, and other things in a way that looks artistic, intentional, and complete. My sister Adrienne just did a really cute one at her house and sent over her pictures. 
The best way to do a gallery wall is to lay it out on the ground first.  This way, you can move it around until you get it the way you want it without putting any holes in the wall. 
If you really doubt your skills on actually hanging it, you can get a piece of butcher paper, newspaper, or card board and trace around the items. Use this as a pattern to tape on the wall and mark where the holes go with a thumb tac. 
So cute, right? Good job, Adrienne!  I have also done a gallery wall recently. 
Frames don't necessarily need pictures to look good. Especially these great vintage frames that are artwork in and of themselves. You can also use larger frames to go around smaller ones. This makes all these different pieces look like one collection. 


For a more formal look, use all black and whites or sepia tones. You can also do a very modern look using the same method with sleek black frames and black and wite photographs. 

Have fun putting together your gallery wall!
-LeeAnn

A good ol' fashioned guest room.

I am blessed to have extra room in the basement of our house. My husband and father in law finished it a few years ago and it's been so nice! I love having guests and I want them to feel at home and comfortable in their surroundings. I finished decorating it a while ago and finally got around to posting it! 
Since it's in a basement, I wanted it to feel very bright and cheery. So I chose yellow for the walls and ceiling. I wanted it to have a cozy cottage feel and felt like a quilt would be a really nice touch. I found this quilt and pillow set at Walmart for $20. Score! I already had the other items and I made the decorative pillow from extra material. 
I picked up this vintage dresser when I was 16. Yes, I have loved furniture and design forever. Lol. It's great for company who is staying for a long period of time so they don't have to live out of a suitcase. It's also nice as an additional space for company to get ready with the mirror. 
It's also nice to have a little message board with important info- like wifi password! 
I was using my phone, so the lighting is kinda funky. This is a dollar store project. Baskets nailed to a wall. Seriously anyone can accomplish this! I didn't really have a budget for this room ( as is the case with most of my decorating) so this worked out great. Simple, cute, and cheap. My three favorite things. 
The artwork above the bed is my husband's grandfather's hymnal from his pulpit when he was a Pastor in Michigan.

The room is pretty small so night stands would just make it too crowded. I will probably end up doing some small shelving mounted on the wall like in my master bedroom. 

Hope this inspired you to set up your guest space! 

Thanks!
LeeAnn 


Thursday, October 17, 2013

Coffee table up-cycle

My sister needed a coffee table for her new living room. It's a pretty big space, so she was looking for something pretty meaty. We were at a thrift store when we saw this beauty. 
Adrienne was a little skeptical at first. After all, it's a giant brown rectangle. After much contemplation, we decided it had hope. It was cheap ($20) and the additional storage didn't hurt either. 

Ok, so now what? The back wall in this picture, which is the kitchen/ dining room, is going light gray-blue. We want to tie the living room and the kitchen together, so we chose to use the wall color on the table. I told Adrienne all about the new finish I had been using... Yep... Chalk paint and wax. :)

I have had a lot of fun with this technique. It's stupid easy and cheap. And of course it looks super cute. Its just time consuming so plan to block out some time. The supplies needed:
Latex paint
Plaster of Paris ($7 ish)
Black paint
Vaseline
Wax (I use Minwax paste wax  $8 ish)
Painters tape
Glaze (optional)
Rag
High grit sandpaper
Cheese cloth $2

All of these supplies with the exception of Vaseline can be found at the Home Depot or Lowes. 

There is no sanding or priming needed with the chalk paint finish. So just make sure it's clean. Add black paint to any areas that you want to have black showing through. I like to put it on the edges, cracks, and corners. Let it dry. 

Next, add Vaseline over the black paint with your finger. Don't put It on too thick. Wherever you put the Vaseline, your next coat of paint will not stick, so just keep that in mind while applying. 

Next, mix your chalk paint. 1/2 cup plaster of Paris with 1/2 cup warm water. Dissolve. Mix in to 2 cups of your latex paint. It's that easy! 
Now the fun part. Start painting! Brush it on going with the grain. It took 2 coats of chalk paint. 
Let it dry. It actually dries really fast. Plus we had a fan blowing on it. I know every other tutorial I have read says to let it dry over night, but this was ready to go in about 3 or 4 hours. So the next step was to wipe it down to reveal the black. 
It just wipes right off! After I wiped it all down, I took a really high grit sand paper and went over a few spots. We really liked the combination of both the black and the wood showing through. I feel like it adds a lot of depth and warmth to the piece. It's up to you however you want to make your own furniture. ;)

On this particular piece, there is an intricate design on the bottom that I wanted to stand out. I decided it would be faster to just glaze it. Apply glaze, let it sit until tacky, and then wipe off with a damp rag. The glaze will stick in all the cracks. 

Once it was all distressed and ready, we decided to add a chevron pattern to the top. I measured the length of the piece and determined how big I wanted the pattern. I watched a bunch of tutorials on how to paint a chevron pattern, but they all failed to tell me how to get I the right size so that the pattern would look even and centered. 

The table was 56" long, so I divided it by 8 and decided to make my triangle have a 7" base. I really think I just got lucky the way it worked out. I hate math. If you choose to do a pattern, just make sure it's even on the surface you are painting. However you choose to do that is up to you. 
We wanted it to be a subtle contrast. So we made another small batch of chalk paint using 1/4 cup plaster, 1/4 cup water, 1/2 cup blue paint, 1/2 cup white paint. Apply.
 We let it dry for about an hour and peeled off the tape. 
We enlisted the help of the kiddos to erase pencil lines from when I was tracing my pattern. 

Let it dry a full 24 hours before you apply any kind of top coat. We are using the wax finish. It's so easy! Just rub it on with cheese cloth, and buff it about 15-20 minutes later. We did 2 coats on the sides and 3 coats on the top. This is our final product:
It was a really fun project! Thanks for checking it out. 

-LeeAnn 

Friday, September 6, 2013

Yummy, healthy shake

I've tried to be somewhat health-conscious lately. Not really cutting back on a ton of calories, but just making sure my family is getting proper nourishment. I have been adding spinach to a ton of our meals. Since my husband and kids won't eat it, I have resorted to hiding it in things :)

I have chopped it up really fine in my magic bullet and blended it with jelly for pb&j sandwiches, and did the same in spaghetti, and more.

Something I like to make for myself is a smoothie after I work out. It's yummy, filling, and gives me the energy I need. I made it up - so you can alter it however you want.

Frozen banana
Handful of frozen spinach
Breakfast Essentials packet
1/2  or 3/4 cup milk (up to you on how thick you want it)
Spoonful of peanut butter

Throw it all in your blender and blend until smooth. That's it!
Its roughly 470 calories depending on if you use fat-free options. Which is great for a meal replacement option.

Enjoy! -LeeAnn

Saturday, August 31, 2013

Vintage Inspired Play Kitchen

 I picked up this sad and dirty little kitchen at a storage unit sale.
When I say sad and dirty...I mean vile. Filthy. Spider eggs. It smelled...weird.
 
 The storage company had a bunch of people that were delinquent on their payments, so they sell all the stuff in the unit. Its sad that people lose their stuff this way....  But I'm not going to lie.... You get awesome deals from these types of sales. I felt like I was in an episode of Storage Wars or American Pickers. I scored a lot of really cool stuff for pretty cheap.
This was my first project using chalk paint and wax. I used a recipe I found online and went to town. It was so easy to use, although very time consuming compared to my usual technique of spraying. The bones of this little kitchen were pretty good, but the lower cabinets were in really rough shape so I decided to bag them (after about an hour of trying to get them to fit right, and level, and stay closed...grrr).

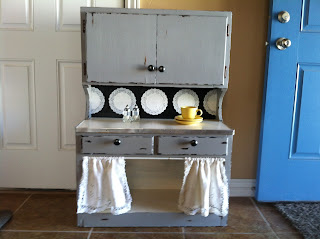
 Here is the finished project. I modge-podged paper doilies to the backsplash, added little hooks for teacups in the upper cabinet, used chalkboard paint on the inside of the cabinet doors, changed the pulls, and used vintage tea towels for the curtains. Several hours... but worth it.


I LOVE the way it turned out. This kitchen sold to a very nice lady :)

-LeeAnn

Its been a while...

It HAS been a while. Over a year since we have done anything to our blog. The main reason for this?

 Life.
Crazy life.

'Nuf said, right?

So, we have decided to start again. We have re-designed the site and have a lot of great things to share with you from our homes.