Saturday, August 31, 2013

Princess Dress from a T-shirt

I really like to sew...easy stuff. I would probably call myself an "advanced beginner" when it comes to sewing. I know some of the basic tricks, but there is a ton I still need to learn.

My 4 year old daughter LOVES Rapunzel. I wanted to buy her a Rapunzel dress for her birthday, so I went to the Disney store to check them out. Imagine my shock when I saw the $50 price tag. FOR DRESS UP??!! So went to Walmart. $22. For CRUMMY dress up?? So then I decided to buy a pattern and make one. $15 for a pattern. And like yards and yards of fabric. Which would probably be another $15-20. And the pattern looked really complicated and involved multiple skirts and layers....

Ouch. That's way more money and time than I am willing to spend.

That's when I hit Pinterest for some savvy ideas. It took me a really long time to find one that was as easy as I wanted it to be. Some of the free patterns didn't really make a lot of sense to me (an advanced beginner, ha!)  So I found this really great idea on making a child's dress out of a t-shirt. Now that's more my speed.

I found an old shirt of Taylor's (my 4 year old) that was already unraveling at the bottom. I also found a couple feet of purple fabric at a yard sale for $1. I purchased a roll of decorative ribbon for $2 (which I only used about .50 cents worth for this project).

First, I started by cutting off the bottom of the shirt so that the skirt would start at the waist (I just held it up to Taylor and marked where I wanted the skirt to start).

Now, I wanted to add the Rapunzel- type embellishments to the front of the shirt. The base fabric I chose is the same that I am going to use for the skirt. I wanted to make it wide enough to cover up the bow on the front of the shirt. I pinned some gold rick rack on the front to look like the corset-style dress that Rapunzel wears. And sewed in in place. I chose to use the edge of the fabric that was already finished at the top so that was one less thing to sew. I'm lazy...well actually I am just limited on my crafty time- so I have to make the most of it. ;)

 Then I pinned the border fabric on. Remember- right sides together! It gives you that nice hidden seam when you open it back up.
 See?
 I folded the top corners down and pinned it to give it a more finished look. And sewed them in place.

 And added on some ribbon at the last minute. Since this is decorative ribbon, I just sew it directly to the front of my embellishment.
 And folded the corners of the ribbon down to make it look nice. Pin it to the front of the shirt. Make sure you only pin to the front of the shirt, careful not to get the back of the shirt ;) I stuck a DVD case inside the shirt to help keep the front and back separated.
 Maneuver it on the sewing machine so that you are only sewing to the front of the shirt. Its easy to do because the t-shirt material is stretchy.
 
 There. The top of the dress is DONE! (well, almost. I actually used the ribbon on the sleeves to make a stripped effect... you will see in the finished pictures. I forgot to take pictures of it. But its the same concept as above)
 I took a few feet of the purple satin material and made the skirt. If you don't know how to gather, this is a great tutorial here http://www.sew4home.com/tips-resources/sewing-tips-tricks/gathering-ruffles-made-easy  I use the straight stitch method.

I also found some cheap purple sheer fabric and made an overlay with it. I didn't sew it together like I did on the main skirt because I wanted it to be open in the front. I added more of the ribbon to the edges. I centered it on the main skirt and sewed them together.

Now its time to sew the shirt to the skirt. Turn the shirt inside out and upside down and fit it over the skirt. So you are shoving the top of the skirt through the neck hole of the shirt... make sense? Same concept as right sides together. Make sure the center of the shirt is lined up with the center of the skirt.
Now, pin the shirt to the skirt and sew it in place. Take your time, making sure your fabric is pulled tight and you are not accidently sewing lower parts of the skirt up to the shirt. That would look funny ;)
Now turn your dress right side out and tah dah!
(see the ribbons on the sleeves?)
An easy, cheap, comfortable, washable, durable princess dress. I have already washed it once. Hang dry.
 My lines are not straight. But Taylor didn't notice. Like I said, time crunch.


 Taylor was pretty happy.  And I was happy. I don't care if she plays in it, eats in it, or jumps in it.


Monday, June 25, 2012

Shabby Chic Trunk!

In my house- if it doesn't move- it gets spray painted. I love spray paint. It transforms anything. I picked up this trunk at a yard sale the other day. It was just a normal grey color with silver hinges. I love the color yellow and decided to paint and glaze this. However- I already have a giant trunk in my house that I painted turquoise. (and I am trying to raise money for Disneyland :) ) SO THIS ONE IS FOR SALE. $60. The dimensions are 30" x 15 1/2" x 12"  (LWH). Perfect for home decor, storage, or a child's toy box in their room.

SOLD!

       -LeeAnn


 .

Wednesday, March 7, 2012

Slow Cooker Series - Thai Peanut Curry Chicken


Who doesn't like a good easy slow cooker meal? I think it's one of the easiest hassle free meals ever. With the great idea from Nicole we are going to start a slow cooker series for a couple weeks. All three of us are going to post some good recipes that our a hit in our homes.

I made this dish a couple nights ago and my whole family loved it. I found this recipe on this website, The Slender Kitchen. Then pinned it to my "Healthy Grub" board. I think it is a Weight Watchers recipe but I'm not sure on that. I pretty much followed the recipe only instead of using Coriander I used Curry powder to give it more flavor. I really like how it turned out and will use Curry powder from now on. I served it over brown rice. Serving it over noodles or even Quinoa would be awesome too.

Here's the breakdown of the nutritional value (via Slender Kitchen)
Serving Size: 3/4 cup
Calories: 237 Calories
Fat: 9.1 grams
Carbs: 14.1 grams
Protein: 28.5 grams

1.5 lbs of chicken breast tenderloins
1 red or green pepper, diced
1 onion, chopped
1/2 cup reduced fat chunky peanut butter
Juice of 1 lime
1/2 cup non fat chicken broth
1/4 cup reduced sodium soy sauce
1/2 tbsp cumin
1/2 tbsp curry powder

Place chicken, red peppers, and onion on the bottom of the slow cooker.
In a bowl whisk the peanut butter, soy sauce, lime juice, chicken broth, cumin, and curry powder. Pour over chicken. Cook on high 4 hours or low about 7 hours.
Remove chicken, shred and then put back in slow cooker.
Serve over rice, noodles, or quinoa.
I also topped with a little bit more soy sauce

Serves 6

Adrienne

Tuesday, February 28, 2012

Slow Cooker Series- Mexican Style Shredded Pork


Yesterday I didn't feel like going grocery shopping. I was at a loss as to what to make for dinner. So, I went digging in my freezer and found a 2 pack of boneless pork tip roasts that I had purchased a couple months ago on sale at Costco. Hmmmm.... what to do with it? I figured I would make something in the slow cooker. OK, WHAT? Then I went digging in my pantry and I came up with some enchilada sauce, black beans, chopped green chilies, ect. I threw it all in the slow cooker and ended up with a delicious, flavorful and most of all EASY meal that the family loved AND I even had plenty of leftovers for a second meal the following night (double SCORE). Last night we had the shredded pork over a fresh salad with romaine lettuce, avocado, tomatoes, cheese, fresh cilantro and lime. Tonight, it was a choice between burritos or quesadillas. Of course, I ended up making both because everyone wanted something different! This shredded meat would also be great in tacos, taquitos, enchiladas.... well, you get the point!


Ingredients


- 2 Boneless Pork Tip roasts (from Costco), or 1 large boneless pork roast approx. 3 lbs.


- 2 Tbsp. oil


- Pepper to taste


- Seasoning Salt (I used ADOBO All Purpose Seasoning)


- 1 large onion, diced


- 2 15.25 oz. cans black beans, rinsed and drained


- 2 15.5 oz. cans hominy, drained (you can substitute with pinto beans if you choose)


- 1 7 oz. can chopped green chilis


- 1 28 oz. can red enchilada sauce


- 8 cloves fresh garlic, chopped


- 1 jalapeno, seeded and diced


Heat oil in large pan and season whole roasts liberally with seasoning salt and pepper. Brown on all sides. Remove from pan and place in slow cooker. Add all other ingredients on top of meat in slow cooker. Cook on high for 6 hours. Remove roasts and shred meat with a fork. Return shredded meat to slow cooker and mix it with contents in cooker. Meat will soak up all of the liquid. Serve in one of the many options listed above and enjoy! ***I also froze some of this and it freezes great!***


-Nicole


Sunday, February 26, 2012

Quinoa Breakfast

Like I mentioned in my earlier post I am going to post healthy recipes I've found and tried. If I think they make the "blog cut" I'll post them. I cooked some Quinoa. Which is pronounced (keen-wah) after being corrected by my sister because I was saying it totally WRONG! Haha, we got a good laugh out of it. Anyways, it smelled a little funny but tasting it raw it really didn't taste like much. I think it just basically takes on whatever flavor you are mixing it with. I had my kids taste it raw and they didn't gag or fake vomit so that's a good sign! :) They said it was pretty good.

I found this breakfast recipe on this site Monica Nelson Fitness via Pinterest.

Both my husband and I thought it was really good and I will be making it again. It's a nice change for a healthy breakfast option since I'm not an egg eater.

I cup of cooked Quinua
stir in milk of your choice (I used skim)
1 packet of sweetener
Dash of Cinnamon
Sprinkle with your choice of nut (I used pecans, original recipe used walnuts)
Drizzle of honey (original recipe call for Agave or Maple Syrup)

Cook your Qunioa according to package directions. (I cooked mine the night before then just heated it) Stir in milk, sweetener, cinnamon. Top with nuts and drizzle honey, agave or maple syrup.

A box this size is $4.97 at Walmart. I thought it was little pricey but I'm told you can get it at Costco and it's priced a lot better for the amount you get. PS - IT'S GLUTEN FREE

Here's what it looks like cooked. The texture is a little different. Something to get used to, but I will definitely be using this for more recipes.

Adrienne

Saturday, February 25, 2012

Organize, BABY!

How to fit 0 - 24 months in one closet.


I have been on an organizing kick lately. I love it so much. Its really one of my hobbies. My husband thinks I'm crazy because I like to walk down the storage aisle at Walmart and fantasize about how I could organize stuff.

I now have two beautiful girls- one is 2 1/2 and the other is almost 4 months. I have been so blessed to have family and friends who have given me so many beautiful hand-me-downs. And really, everything has been in such great condition, they feel brand new! I have barely needed to buy them anything besides diapers and such. Storage is always an issue when you have kids - so I have been trying to figure out the best way to store everything while keeping it neat and accessible. I found with Taylor that there were so many outfits she grew out of before she wore them because they were at the bottom of the drawer. I could never find what I was looking for and it was really frustrating.

Storage can be a huge investment. I watch shows like The Amandas on HGTV and see all the beautiful baskets and containers they get. Have you seen how much a basket is at Walmart? They want anywhere from $7 - $30! I don't know about you, but I can't swing that if I have to buy multiple baskets or containers for one project.

Solution? The Dollar Store and and a little creativity.

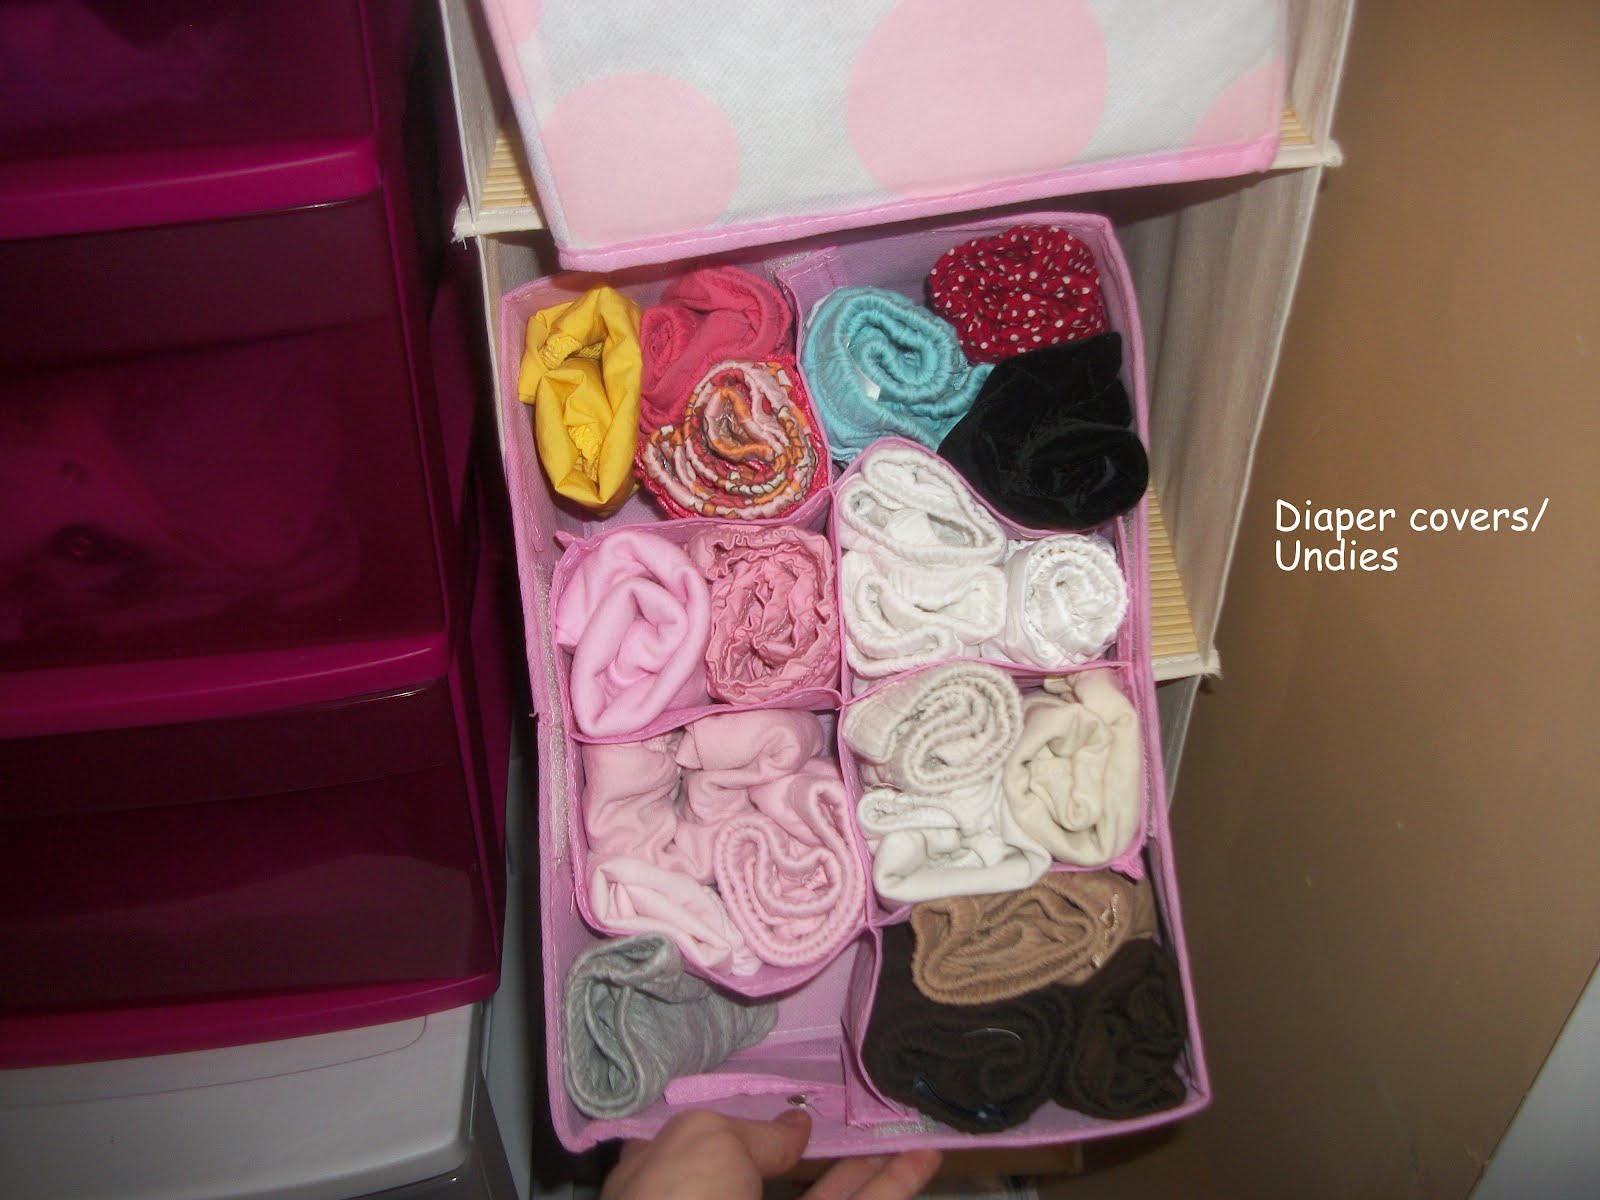
The dollar store in Spanish Fork has an amazing storage selection. Check this little guy out: Here are some tips for keeping things organized:

1. Get rid of stuff. We all have things that we hang on to that we really don't need. It took me getting to baby #2 to realize that I don't need 4 pairs of 6-12 month blue jeans. She really won't wear all of them. She has pink, purple, blue, white, and tan jeans in the same size. Over the last year I have been purging so much clothing- mine, John's, the kids...and I haven't missed anything. For adults, here is a good rule of thumb: If you have not worn it in over a year, get rid of it. You can do it- just let it go! Pass them along to someone who needs them or find a good charity. Here is what I purged from Avery's wardrobe- and this is only size 0-9 months! 2. Think outside of the dresser. Since I don't have a dresser in Avery's room, I turned to other means of storage. I love to use plastic drawers in the closet. They are very inexpensive and they hold a lot. I also like the hanging storage from Ikea- its only $9.99 3. Buy Storage to meet specific needs. Everything should have a place. Some of the hardest things to keep organized are small things. I always find myself digging through the girl's drawers looking for leggins, tights, socks, etc. So- I found these great little organizers at the dollar store. And they are so cute! I was able to have all of the clothing in one place- which makes it easier find the next size up- as well as immediately put clothing she grows out of away. I am so much more motivated to put away the small clothing when I don't have to go in the basement, lug the boxes upstairs, put everything away, lug them back downstairs. Now, all the boxes are all in one place. I also found a really good idea on Pinterest for cheap storage. Diaper boxes covered in material or scrapbook paper! Here are a few I made for my family room. Since we are downstairs most of the time, I don't want to run upstairs every time to change a diaper or grab a burp cloth. So we keep a fully stocked baby changing station down stairs. Look at my cute baby! :)
I know this turned out to be a really long post- but I just LOVE organizing and getting new ideas. Thanks for reading!


-LeeAnn

Eating Healthy


It seems that most the recipes I've posted have been extremely fattening. Although delish they are probably not great for the waistline. I actually cook a lot of healthy stuff too. I just haven't posted any of those because I don't think they make the cut for the blog. I've run out of ideas! So I turned to Pinterest (what else?) for inspiration. I've made my "Healthy Grub" board and have found a TON of yummy recipes I'm excited to try. So I will pass on the good ones to you and anything else I make up in the kitchen! I bought some Quinoa. I've heard great things about it but never even knew it existed. Soo, stay tuned.

I'm making Southwest Stuffed Bell Peppers tonight with ground turkey. If it makes the "blog cut" I'll post the recipe. :)


Adrienne