Showing posts with label Halloween. Show all posts

Monday, October 24, 2011

Baked Pumpkin Stuffed With Sausage, Rice and Mozzarella

Last Halloween I wanted to make dinner in a pumpkin on Halloween night. I wrote this down from one of my friends Facebook. I can't remember who it was!! So, if you recognize this recipe, THANK YOU and let me know so I can give you credit! I'm making it again this year! It was yummy and made the house smell SO good. Not to mention it was festive and makes a ton. So, if you are having people over it's a great meal.


1 pound of ground Italian sausage, cooked (I'm not an Italian sausage fan, so I used regular)
1 pound of ground beef, cooked
1 pound of ground veal or lamb, cooked (I didn't use this, I just used 2 pounds of ground beef)
1 sauteed chopped onion (I cooked this with the beef)
2 cups of cooked rice, al dente
1/2 cup of grated parm cheese
1 1/2 pounds of mozzarella cheese, cubed
2 cans of diced tomatoes, undrained
1 green pepper, diced
Salt and pepper to taste
1 large pumpkin, scooped out (It doesn't have to be a pie pumpkin, just a large regular pumpkin)

Season the inside of your pumpkin with butter, salt and pepper. The original recipe calls for nutmeg on the inside of your pumpkin. I did that last year and wasn't big on it, so I'm not going to add it this year. But if you like nutmeg then add it!

Mix all ingredients in a large bowl then add to your scooped out pumpkin. Put your pumpkin on a cookie sheet and bake at 350 for about 2 to 2 1/2 hours. Just keep checking it. When the cheese is melted and the pumpkin looks like the picture below it's done.

Last year we just ate it out of regular bowls but this year I think I will serve them in either bread bowls or little scooped out pumpkins.

Adrienne

Monday, September 26, 2011

Halloween Rosettes

I had some extra fabric left over from the Halloween rag wreath I made so I wanted to make my girls some rosettes for their hair. If you don't know how to make them already they are really simple. Not only do they look so cute in your hair but they look cute on wreaths, pillows, and I've even seen them on lamp shades. So if you don't have girls you can make them for tons of other things.

I got the brads at Walmart in the craft department and the clips that you glue on the back I got a box at Sally Beauty Supply.

I found a video tutorial on Cherry Street Cottage. Even though my sister taught me how to make them (thanks LeeLee!), this video is pretty darn close to how I learned. So, call me lazy but I decided to give you the link instead of making a video myself. :) I could have taken pictures to show you each step but it's so much easier watching someone actually do it so I thought this video was more helpful.

A couple things I do a little different than the girl in the video:

*I use FABRIC GLUE, not hot glue. That way you won't burn the "you know what" out of your fingers!
*When you fold your fabric in half before you actually start your flower, glue your fabric together. That way you won't have to worry about your fabric coming apart as you are trying to make your flower.
*When you are all done cut a small circle of fabric and glue to the back of your flower to hold it all together a little better.

Good luck!

Adrienne


Tuesday, September 20, 2011

SpOOOky Halloween Decor

I thought I would share some fun Halloween decorating ideas. I forgot how much Halloween and fall stuff I had until I pulled it all out of my storage room! This isn't even all of it either. I have a ton of stuff I'm still putting on my porch! Money well spent in my opinion! Ha.

I saw this mantle idea with the sticks and birds on Pinterest. When I saw it I thought I had the PERFECT mantle for it. I put my own twist on it. I LOVED how it turned out. Even if you don't have a mantle a large shelf would work too. Just pull off some dead branches from a tree and spray paint them black. Luckily I had saved all my sticks from last year so I got to skip that step this year. :) Martha Stewart has some of the best decor for Halloween. The candelabra is from her collection and the web and spiders all came on the sheet with the candelabra. It was $10 but I had a 50% off coupon at JoAnn's. The birds are also from JoAnn's on sale for $3.50 each. (FYI - if you have an IPhone there is a JoAnn's app and it always has coupons you can use in the store)

Here's some up close pictures


*******************************************************************
Something I started doing with my holiday decor is; instead of spreading it all over my house I put it in a couple specific areas depending on how much stuff I have. One of those areas is in my dining room. It's a very traveled part of my house so it really stands out.


********************************************************************************
I saw this cute Halloween keepsake project on this blog. I thought it was such a cute thing to have and keep has your kids get older. It's really simple. Just paint a canvas black and then the bottom of your kids foot white .The writing is easiest done with a paint pen.

*******************************************************************
I LOVE blogs that offer free printables, so cheap and easy! Here's where I found this one, Blooming Homestead. She also has a cute Thanksgiving and Christmas one.


*Just a hint...instead of following the down loading instructions; double click the picture you want, right click it and save it to your desktop. Then upload it to wherever you get pictures developed and have it printed as an 8x10 on photo paper. Then you won't have to worry about them getting ripped and you can use them next year.

Adrienne

Monday, September 12, 2011

Halloween Rag Wreath

I actually used to think Halloween was not that great. I don't know why, I'm probably the only one. Then my kids got a little older, and my mind started to change. They get so into it, it's hard not to feel the same way. They love to come home from school to find the house all decorated in Halloween decorations.

I'll miss the summer but oh how I LOVE the fall! The food, the family gatherings and of course all the trees changing.

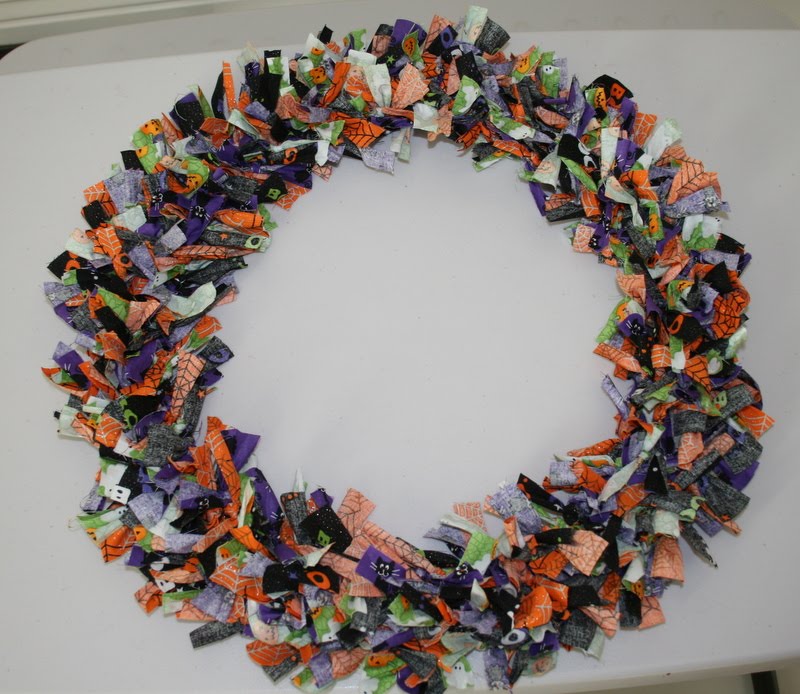
I saw this rag wreath on a blog I discovered that I love, Sassy Sanctuary. She has some really cute and fun stuff on there. This wreath is simple but kinda time consuming. It's worth it though because it turned out so cute! Here's the step by step instructions:


Start with a wire wreath. I got mine at Hobby Lobby for .99 after using my coupon. Then get 4 different kinds of Halloween fabric. Be safe and get a half of a yard of each pattern, so 2 yards all together. JoAnn's had the best selection and they were on sale when I was there so that's a BONUS. You will have some left over. I'm using my leftovers to make Halloween rosettes for my girls hair.

Cut your fabric into strips. 6 inch long by 1 inch wide. Then start tying them in a pattern around your wreath like shown below. Be sure to double knot so they don't come undone.

Yes, it's a painstaking process. It took me a couple seating's to get it cut and tied. But hey you can get caught up on your DVR shows while doing it. :)

I bought these BOO letters and painted them orange (well my 10 year old did). Any craft store sells them, I even saw them at Walmart. I took a sponge paint brush and rubbed ink on the edges to give them the worn look. Then I just hot glued them directly on the wreath.


I wanted a simple bow since my wreath was pretty busy.


To give your bow a finished look take small a strip of ribbon...

and wrap it around the middle of your bow and then hot glue it together

Then take another strip of ribbon, hook through the second hoop of your wreath and hot glue together. You can make this part as long or short as you want depending on how low you want to let your wreath hang.

All done, isn't she cute? :)
Align Center
*Keep checking back because during the next month or so we will have more fall decorating ideas and projects and of course some food! Soups, desserts, and dinner cooked in a pumpkin for Halloween!*


Adrienne